Building a Kit Guitar - by Troy Kase

Ordering the Guitar Kit
After playing many guitars, I have made the decision to build a guitar kit. This conclusion was not easy to come to, but I want a nice guitar and I do not want to spend the thousands required to have a guitar that meets my taste. I should also mention that I am definitely not an accomplished guitarist nor do I ever perform. I just want an easy to play nice sounding guitar and I like the idea of building it myself.
I have some woodworking experience, but I don't consider myself an extremely talented woodworker. After reading a blog by LeafCutterJohn on building his guitar from Stewart MacDonald, it was easy for me to come to the conclusion that I have enough woodworking experience to complete this project. This guy seems to be extremely talented given his lack of woodworking experience and the absolutely beautiful job that he did completing the kit.
I searched many kits, and I would love to try a Martin kit one day, but the information out there all points to buying your first kit from Stewart MacDonald because of the excellent instructions that are provided. Having said that, I think that Stewart MacDonald makes a ton of money from selling the kits and then trying to sell some very over-priced specific tools to the makers of the kits. I will do what I can to keep the tool cost down and buying from hardware stores whenever possible. It may require some extra work, but I cannot justify another $500-$700 in tool costs. An example of this is a fret hammer for $20 at Stewart MacDonald (really?) when I can go to Harbor Freight and get a similar hammer for between $3 and $5.
Kit was ordered yesterday (July 9, 2009). Kit arrived on July 15.
Stewmac instructions are excellent and so is the DVD. I am very happy that this is the kit that I chose to order. I read the instructions, watch the video, read the instructions, watch the video, and then build. I resist the temptation to assume that I know what I am doing.
Kit Pic


Stewart MacDonald Kit

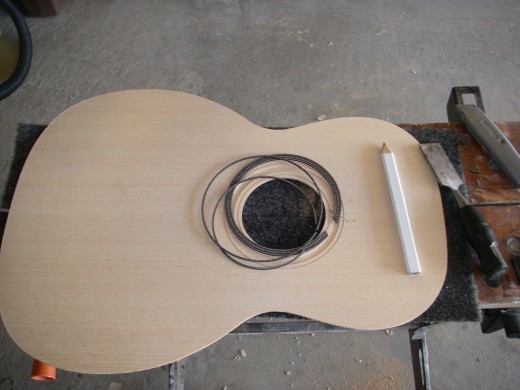
Next Step. . . Sound board Rosette
I am going to be better about taking pictures here. Here is the sound board with the loose rosette. The herringbone rosette is really pretty and is making me want to use herringbone despite the extra work (larger step cut routing and bending of the herringbone).
As can see in later pics, no herringbone. I got scared of the extra bending that I would need to do with the herringbone. It would have looked good though. I went with white/black/white purfling to match the accent on the rosewood binding from StewMac.
Rosette
Preparing the Sides and Kerfing
Sanding the kerfing down to the proper angles went pretty easy. Om the top the angle of the black that you seeis 1.5 degrees and for the back it is 5 degrees.
Preparing the kerfing
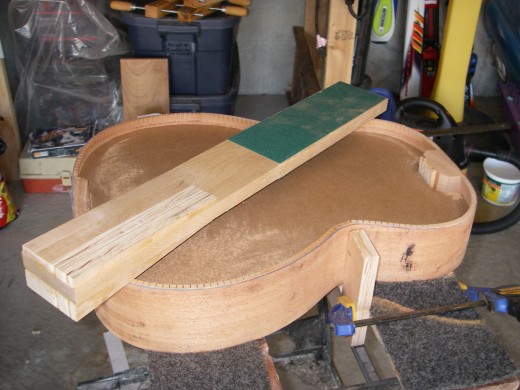
Installing the Bracing
To save money on clamps, I usually only glued one brace at a time. Come home for lunch, glue a brace and glue a few more in the evenings. You might also notice some color differences around the edges. I sprayed the inside of the guitar with Tru-Oil before gluing it together to slow the transfer of moisture in the dry climate of Idaho.
Also, when I chiseled the ends of the bracing down to .100", I realized that was cutting it extremely close. If you have seen LeafCutterJohn's site his binding did not cover up the bracing on the side of the guitar in one spot. I made sure this wouldn't happen by going down to about 1/16" on the ends of the bracing. Even doing this, it was awfully close to not being covered up by the binding. StewMac's instructions seem to be for the extra large plastic binding that came with the kit.
You might also notice some color differences around the edges. I sprayed the inside of the guitar with Tru-Oil before gluing it together to slow the transfer of moisture in the dry climate of Idaho.
Bracing


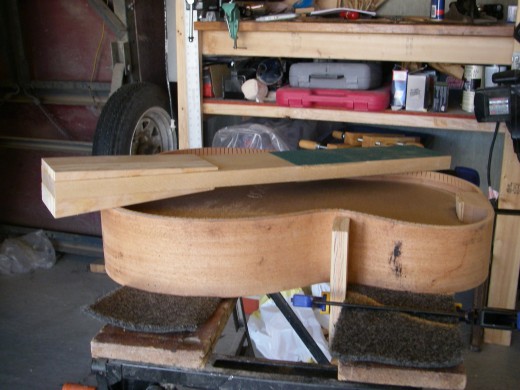
Binding Channel Routing
The StewMac folks talk about building a 5 degree base to attach to your router. Sounds fine. . . but wait, measure the angle of the back of the guitar. It is only 5 degrees up to the upper bout. From there out it is between 1-2 degrees.
The trick is to keep your routing guided by the side of the guitar.
Cost of this jig, about $1 with a few nuts and bolts along with some
scrap oak. Cost of the trim router. . . $80. I couldn't bring myself to
use a $16 Harbor Freight laminate trimmer. The only mistake that I made here is that the piece on the jig that guides the top should be slightly more narrow in width as to not cut too shallow on the back by the steep (5 degree) angle. This could also be accomplished by filing the guide on the jig to a 5 degree slope.
Couldn't be much happier with the results here. Doing this took the fear right out of installing the binding. However, I didn't mention that I had an old, cheap, trashed Wal-Mart guitar to practice on first.
THE DREADED ROUTING OF BINDING AND PURFLING CHANNELS


Bending the Binding
To my wife's chagrin, I used her curling iron. It heats up to 380 degrees and the diameter was just about perfect. I was amazed by how easy it was to bend the binding. As long as it was wet and I heard a sizzle, it bent great.
I simply hammered in nails in my workbench to use as a form to keep the
binding shape. It all sounded like a good idea until I hammered in one
last nail, missed the nail, and crushed the binding. The stupid in me
considered doctoring the binding and using it but good sense prevailed. New binding is on the way.
Bending the Binding


Installing the Binding and Tail Peices


Headstock
Binding Problems
The new binding arrived and it turns out that the manufacturing process has chnaged so the binding would not match. However, the people at StewMac are being very helpful and have found some pieces of the old stuff to send.
On to the head of the guitar
I glued the rosewood to the headstock and shaped the holes. I also slightly rounded the top of the head. Maybe it is traditional to have it completely square, but I did not like that idea.
I also added a green abalone inlay to the headstock. The abalone was cut using a cheap disk on my Dremel. It cut very easily and I did not have to buy a special jeweler's saw. Cutting out the inlay was kind of tough, but I hid most of my mistakes with an epoxy/rosewood mixture. Sanded down the epoxy and it looks pretty good. Better lighting would have helped this process. Only used my existing tools so I'm pretty excited about not buying any specialty tools.
Yes, I know the "K" looks a bit like an "X". I didn't want to tempt fate and have the "K" break while I was cutting it so I left it a little bolder than I would have like and sacrificed appearance for strength.
Headstock and Binding Problem Pics
.")


Binding Problems Fixed
The folks at StewMac were very understanding of the binding problem. Their new supply of this type of binding is a different color. I believe that the new stuff has maple and not white wood fiber. Anyway, they found some old stuff and quickly sent it out for free. Now that I have done binding once, this went pretty quickly expect for getting the length perfect on the very last piece (I glued most all of it, rough cut then filed into place as I glued it up).
Binding Finished

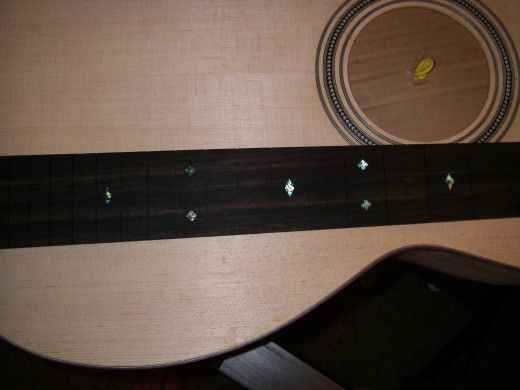
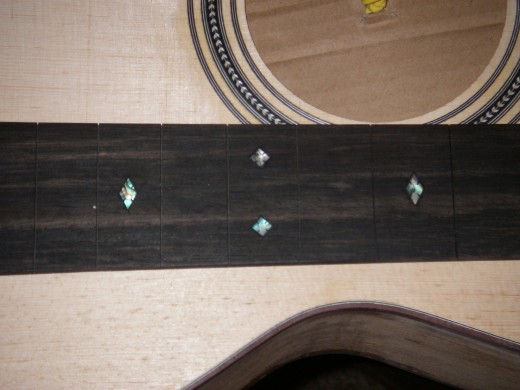
Fret Board Inlays
I'd like to say that inlaying a fret board is easy, but I made plenty of mistakes. Fortunately inlaying is a bit like putting up trim around the house and using caulking to hide mistakes. With inlaying, I used quite a bit of epoxy mixed with ebony to hide mistakes while gluing the inlays. I set the inlays a bit high once I realized that I can file down the abalone.
Of course, the fret board was cut down to match the neck first. I cut it about 1/16" too narrow. Once I measured things out, I had enough extra wood to make things work.
Fret Board Inlay
Fret Board and Neck Work
Neck Angle
A few weeks went by with no obvious progress on the guitar. I adjusted, adjusted, and adjusted some more on the neck to get the angles correct. I see that I made a mistake in making the head block perfectly square with the top of the guitar. I should have done as the instructions illustrated (lay the guitar flat on the top and square the block with the flat surface the guitar lays on). The instructions showed pictures of checking squareness this way but did not explain the importance. Rather than glue the fret board on a then fit it, I would clamp the fret board on and check for the correct angle (did this at least 30 times). This worked nicely since I had an unobstructed area to work on rather than have the fret board in the way while I try to chisel.
Frets
After grabbing a ball peen hammer from my grandpa and grinding the face of end nippers down (a lot cheaper than buying fret cutters), I put the frets in. They all went in without incident. I put in two at a time, placed super glue in the slots, and clamped them for about an hour each. My home built fret cutters worked perfectly and finished the job with some beveling. I beveled at about 70 degrees rather than 60 (I can always do more). I just do not want my strings slipping off of the frets as I play since I can often be sloppy and not press the strings directly down.
Gluing the Fret Board to the Neck
Gluing went very nicely. The rubber band trick than Stewmac recommends works incredibly well at centering the fret board. I glued it up about 1mm past the break point on the neck. but I am getting pretty good with epoxy filler now, so no worries. I was not able to prop the end of the neck up to provide matching relief to the fret board. This required more clamping pressure on the head than I was willing to play with. I did prop the end of and got about .5mm of relief. This helped give me a nice sturdy flat surface to glue onto and force the fret board to conform. Worked perfectly and I have a perfectly straight neck with an unadjusted truss rod.
Shaping the Neck
I chose to simply give everything smooth transitions. I chiseled the diamond shape from the back of the neck. I know that this is a Martin thing, but I did not like it and it will make finishing more difficult (grooves and sharp points). The pre cut neck needed a lot of shaping and one part was very asymmetric.
More Filler
I made up some more filler for the small holes left from the fret slots. I wasn't sure if I wanted to do this, but I knew that I would not regret it.
Fret Board Work


Sanding/Taping
I have decided, since I am doing a hand-rubbed finish, to tape off the bridge and the neck areas on the body. At first, I was reluctant to do this, but I think that it shouldn't interfere with the finishing process and will allow me some leeway to mess up.
I put the neck on just as I would if I were gluing it (lightly clamp to the body, tighten the bolts then clamp more). Then I measured out where the bridge will be (measured at least five times). Then I drew a line around the perimeter of the bridge and the neck. Removed the bridge and the nck then taped about 1/16" in to allow for any mistakes and to allow for me to finish right up to the tape without trying to be perfect. SInce I am hand-rubbing the finish, I left the frets uncovered. If spraying, I would have then covered the frets with tape.
Sanding paper progression: 80 (as needed for shaping), 120, 180, 220, 320.
Sanding and Taping

Finishing
I used Tru-Oil for finishing. It is a gunstock finish commonly used for guitars. I won't go into detail about the product since there is a ton of information readily available on the internet.
I chose to do a pore-fill using Tru-Oil (not easy). It took about 10 coats on the top of putting on and sanding off before I started to see good results of the pore-fill. There are 16 coats on the top, and 10 on the neck, sides and back. I let the sides and back build up a bit more but did not do a pore fill. The finish is very pretty filling the pores using Tru-Oil, but next time I would just use a standard water-based pore filler. I thoroughly rubbed the top down with 0000 steel wool and buffed out with lemon oil. Same on the back, sides, and neck but didn't rub down as thoroughly.
Overall, I am pretty happy with the finish, but I do see the spots that I should have sanded better.
Attaching Neck and Bridge
Attaching the neck went very smoothly. Just sat around and wiped off glue squeeze out for about 10 minutes.
Bridge went on easily. I drilled guide holes through the bottom of the bridge slot and put nails through the holes to hold it in place while I glues the bridge. I was reluctant to use clamps and watch the bridge slip around when I had measured to 1/64 of an inch. Anyway, I just took some scrap wood and sanded it to the contour of the bridge then drilled holes through the e-string locations to run screws thrugh the caul on top and into a caul on the bottom that I made before gluing the body together. Four hours later. . . done.
Finished Body and Neck


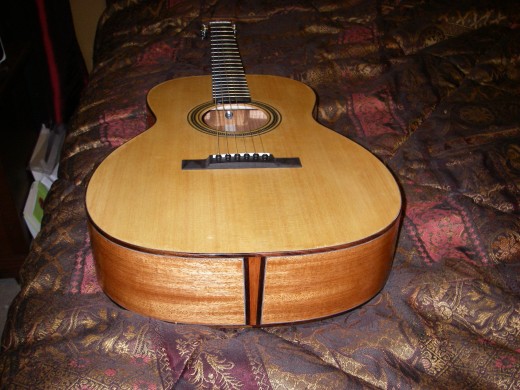
Finished Guitar
Maybe I'll add more description about set up later. After much adjustment to the bridge and saddle, the guitar is complete.
I do have to mention two very disappointing products that I purchased for this step. The Grover H98N tuners are pretty but they're far from smooth operating. I talked to a guy at a guitar shop about them and he said tat Grover always denies that any of their products fail. I'll have to try that one at work, "I don't make mistakes unless I admit to them."
The other poor product was the Grizzly bridge pins. All were different diameters and all were too large (even for a Grizzly Bridge Pin Reamer). I just liked the looks of the Grizzly pins, but I DO NOT RECOMMEND THEM. I reduced the diameter of each one by carefully using a hand scraper.
Finished Guitar